Monday, August 2, 2010

Loading Hyperion Planning Metadata In 5 Easy Steps using OAS

I have resisted adding a Hyperion Planning metadata loader to Olap Automation Studio (OAS) for a long time due to the fact that tools like ODI, Informatica and the out of the box Outlineloader.cmd utility all do this function. But on the request of a few users who felt that the current tools are too difficult to use and at times a bit overkill for what they want to do. I decide to implement this in OAS with the goal of improving easy of use and the time it takes to create such an automation. Below is a step by step guide to using OAS with the new Hyperion Planning metadata loader operation.


Step By Step Guide to Loading Hyperion Planning Metadadata


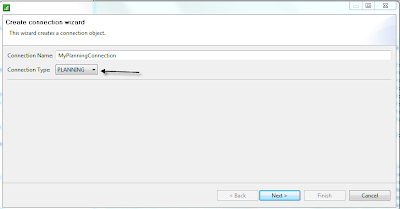
Step 1) Create a Planning connection in OAS. Right mouse click connections from the OAS tree and create a new connection. Choose "PLANNING" as the connection type (see figure below).
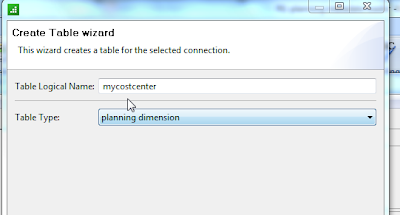

Step 2) Create a planning dimension table. A table is a logical view of the properties for a dimension in a Planing application. Find the new connection you just created above, then right mouse click the connection name from the OAS tree then click "create table" from the popup menu. Choose "planning dimension" as the table type (see figure below).


Clicking next will take you to this screen below. Click the "Retrieve Hyperion Planning Dimension Info" button to retrieve the list dimensions. Choose a dimension from the Dimensions drop down box then click "Load sample data" to view a list of properties for that dimension.


Clicking next will take you to this screen below. Here you can choose which properties you want to load into the dimension. Most properties are optional but the first two are required for loading a dimension table. In this case the the Account dimension load would require at least the Account, and Parent properties. Check "Alias:Default" to load a default alias. Click "Finish" to save the table.


Step 3) Next we need to create a mapping object to tell OAS where to get the source data to load the dimension table we just created. Right mouse click "mappings" uder the OAS library tree then click "Create Mapping" from the popup menu. The Create mapping wizard allows for mapping columns from two tables. In this example screen below the source is a sql server table and the target is a Hyperion Planning dimension table.


Click next to map the columns then click "Finish" to save the mapping.


Step 4) The final step is to create a task using the CopyData operation. This is a generic operation that will copy data from many different sources including text files and sql database tables to Hyperion Planning.

The CopyData operation requires one "mapping" property. Choose the mapping we created earlier from the dropdown box in the Value column then click "Finish" to create the task.


Step 5) Before we can execute the task we need to create an automation. You can do this quickly by right mouse clicking the task name we just created above and clicking "Automate Task" from the popup menu. This will create an automaion with one task with the name defaulting to the name of the task and the word "Automation"

Execute the planning metadata load by right mouse clicking the automation we created above and clicking "Run Automation."


Log into Hyperion Planning to see that the data is loaded.


Assumptions

In this post I am assuming the reader has some familiarity with OAS but even if you have never used OAS before you should be able to download and install OAS in 10 minutes and create this load just as quickly and easily as you see here.

We have tested this loader operation on Hyperion Planning from verson 9.3 to the freshly release 11.1.2.

To get a tutorial and introduction to OAS click here.

Tuesday, July 13, 2010

Create Your Own Maxl Operations in OAS

Olap Automation Studio (OAS) allows for configuring your own Essbase MAXL operations for use in tasks. Configuring operations is a technical function usually done by developers who then distribute the operations as XML snippets for end users to use in their automation tasks. Operations cannot be seen in the OAS GUI but are embedded in the XML file that drives all OAS automations. Operations are used in task objects and define the GUI that the user interacts with when they configure a task.


One powerful feature of OAS is that it embeds the MAXL interpretor inside one of it's operation java classes and allows user to configure it to execute any MAXL command. This tutorial will provide a step by step guide to creating your own MAXL operation.

Below is an example of a MAXL operation that comes installed with OAS, the RunEssbaseAdHocCalc operation. You can see this if you open any OAS xml file that you save.


An operation has 3 main components, the user defined name, the classname of the java class that contains the logic that is executed for this operation and the parameters. The parameters tell the OAS GUI what to show the users of this operation when they use it in a task. Notice in the screenshot below the list of properties in the task wizard are exactly those in the required parameter defined in the operation above.


MAXL operations have a maxl parameter that represents the maxl statement template that OAS uses to replace with runtime values such as the essbase app and db names. Values in the maxl parameter that will be replaced are surrounded by ##'s .

In the example below the values inputted by the user in the task for calctext, app and db will be replace in the maxl statement.

execute calculation '##calctext##' on ##app##.##db##


In the image above the xpath attribute of the parameter tells the OAS GUI to query and fill in the values for the parameter so that the user does not have to type in these values directly. Xpath is a standard xml query language. Xpath's can either return a single value or a list. When they return a list the user sees a combo box.

In this example the essbaseconnection parameter will appear in the task as combo box since the xpath query returns a list of essbase connections.


Step by Step Guide

1) Create the operations element


2) Add the a) errors and b) required parameters . The errors parameter allows for controlling error handling in the maxl output when a command is run. For now we will leave it to detect the words error and invalid.


In this example we are creating an operation for creating a location alias. The maxl parameter is the maxl syntax for creating a location alias that comes from the Essbase Technical Reference guide. Notice the ##'s surrounding the required parameter values aliasname, app, db, toapp, todb, server, user, and password. These are the properties that the user will input using the OAS task wizard and get replaced in the maxl statement when the automation is executed to generate a valid maxl statement that Essbase understands.


If we save the xml file right now and pull it up in OAS, when we create a task using the CreateLocationAlias operation we should see a task wizard screen that looks like this one below. Notice that all the required properties are list as text boxes since we did not define any xpath attributes. We will go back and add this later for the essbaseconnection, app and db parameters.
But as it is currently defined the CreateLocationAlias operation is now useable in a task for creating automations.


3) Add xpath attributes for user friendly combo boxes and automatic fill-ins for the essbaseconnection, app and db required properties.

Rather than retype the lines I just copied the xpaths from the RunEssbaseAdHocCalc operation. Notice the parameter names essbaseconnection,app, and db are the exact ones listed in the required parameter value list.


Saving the xml file and then loading it into OAS again shows this screen below when creating a task using the CreateLocationAlias operation. Notice that the essbaseconnection property is now a combo box that shows all Essbase connections previous defined. Choosing an essbaseconnection fills in the app and db automatically for the user.


The CreateLocationAlias operation we just created is now ready to give to an end user to use for creating automations. The user does not need to know maxl. They simply need to fill in the text boxes.

Taking It A Step Further

If wanted to take this a step further we can use an OAS RunSQLLoop operation to build the maxl statement at runtime. This means we can dynamic create maxl statements using data from a database table to setup location alias, create filters for users, define partitions and so on.

A final word on XPath

The XPaths xml queries used in this example look complicated but are completely optional. If you don't specify anything the OAS task wizard defaults to a plain old text box. Not very fancy but they are still better than writing maxl. A full explain of Xpath is beyond the scope of this tutorial but many good sources of Xpath information exist on the net.